erreurs d’E/S distante NFS ; la modification du propriétaire du compartiment pour le compartiment activé pour FS peut entraîner l’impossibilité pour les applications/utilisateurs d’accéder aux fichiers NFS (en anglais)
Résumé: Le propriétaire précédent du bucket n’est pas autorisé ou restreint ObjectControllerException : la méthode updateObjectInternal n’est pas autorisée pour le propriétaire du bucket précédent ...
Cet article concerne
Cet article ne concerne pas
Cet article n’est associé à aucun produit spécifique.
Toutes les versions du produit ne sont pas identifiées dans cet article.
Symptômes
Modification apportée par l’utilisateur à la page propriétaire du bucket dans l’interface utilisateur :
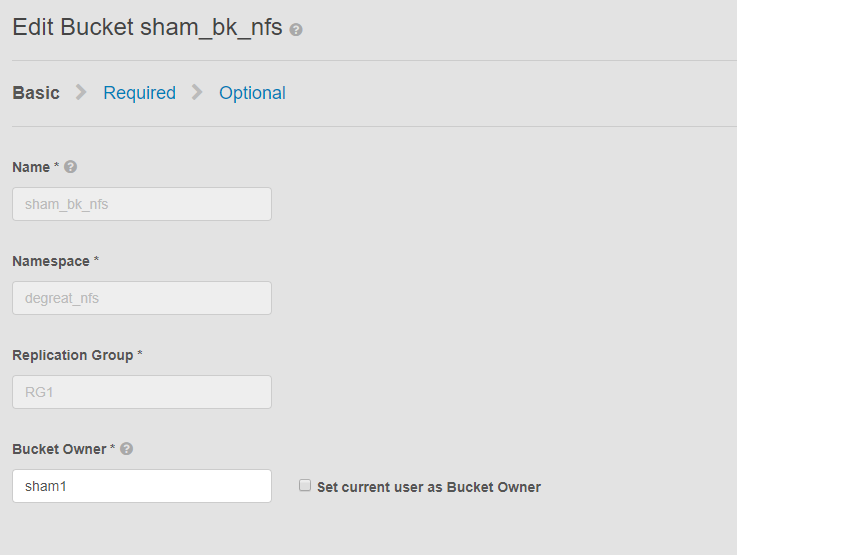
Ce problème s’applique aux buckets compatibles NFS et à une modification du propriétaire du bucket par l’interface utilisateur. Cela peut entraîner la perte de l’accès des applications ou des utilisateurs connectés au compartiment sur le système de fichiers Linux. Même si nous rétablissons la modification du propriétaire d’origine, l’accès ne sera pas possible, ce qui entraînera une indisponibilité des données.
Dans cet exemple,
le propriétaire du bucket a été remplacé par « sham2 » à l’aide de l’interface utilisateur. En raison d’une limitation dans ECS, même après la modification du nom du propriétaire du bucket en « sham1 ». ECS ne redéfinit pas le propriétaire du bucket sur « sham1 » à l’aide de l’interface utilisateur. Cela ne peut être fait pour l’instant qu’avec l’interface de ligne de commande à l’aide d’une API avec charge utile pour réinitialiser la balise du propriétaire sur true.
Pour identifier le problème, sur la machine Linux, demandez à l’utilisateur de toucher un fichier, par exemple :
Ce problème s’applique aux buckets compatibles NFS et à une modification du propriétaire du bucket par l’interface utilisateur. Cela peut entraîner la perte de l’accès des applications ou des utilisateurs connectés au compartiment sur le système de fichiers Linux. Même si nous rétablissons la modification du propriétaire d’origine, l’accès ne sera pas possible, ce qui entraînera une indisponibilité des données.
Dans cet exemple,
le propriétaire du bucket a été remplacé par « sham2 » à l’aide de l’interface utilisateur. En raison d’une limitation dans ECS, même après la modification du nom du propriétaire du bucket en « sham1 ». ECS ne redéfinit pas le propriétaire du bucket sur « sham1 » à l’aide de l’interface utilisateur. Cela ne peut être fait pour l’instant qu’avec l’interface de ligne de commande à l’aide d’une API avec charge utile pour réinitialiser la balise du propriétaire sur true.
Pour identifier le problème, sur la machine Linux, demandez à l’utilisateur de toucher un fichier, par exemple :
admin@node1~>touch file
touch: setting times of `file': Remote I/O error

se svc_log with the string  "method updateObjectInternal "

Command:
# svc_log -a -sr dataheadsvc | grep "method updateObjectInternal"
Example:
admin@node1~>svc_log -a -sr dataheadsvc | grep "method updateObjectInternal"
svc_log v1.0.22 (svc_tools v1.5.3)                 Started 2019-06-06 10:45:04

Running on nodes:              <All nodes>
Time range:                    2019-06-05 10:45:04 - 2019-06-06 10:45:04
Filter string(s):              <All messages>
Show nodename(s):              True
Search reclaim logs (if any):  False

com.emc.storageos.data.object.exception.ObjectControllerException: method updateObjectInternal not allowed for previous bucket owner sham1
Caused by: com.emc.storageos.data.object.exception.ObjectControllerException: method updateObjectInternal not allowed for previous bucket owner sham1
Cause
Création d’un bucket avec un utilisateur spécifique en tant que propriétaire, suivie d’une modification de la propriété du bucket. Enfin, l’octroi au propriétaire d’origine d’un contrôle total à l’aide de la page ACLs échoue avec l’exception de log ECS :
ObjectControllerException: method updateObjectInternal not allowed for previous bucket owner <ownerid>
This is a known issue currently being evaluated by Dell EMC at this time.
Résolution
La solution de contournement consiste à modifier le propriétaire du bucket à l’aide de l’API via l’interface de ligne de commande avec la charge utile pour réinitialiser la balise du propriétaire sur true.
1. Déterminez le propriétaire actuel du bucket.
2. Créez un fichier xml simple à l’aide de l’éditeur vi. Dans l’exemple ci-dessous, il s’appelle /tmp/bucket-owner.xml. Il s’agit d’un processus en plusieurs étapes. Nous devons le définir temporairement sur un nouveau propriétaire de sham2. Comme dans l’exemple ci-dessous, avant de revenir au propriétaire d’origine sham1, confirmez la sortie :
. 7. Une fois la modification de la configuration effectuée, nous ne devrions plus voir la même erreur
1. Déterminez le propriétaire actuel du bucket.
Le mot de passe root de l’interface utilisateur est requis pour générer le JETON. Par exemple :
admin@ecsnode1:~> tok=$(curl -iks https://XX.XX.XX.XX:4443/login -u 'root:ChangeMe' | grep X-SDS-AUTH-TOKEN)
Vérifiez le propriétaire actuel du bucket (compartiment et espace de nommage de substitution dans votre cas) :
admin@node1:~> curl -s -k -X GET -H "$tok" https://XX.XX.XX.XX:4443/object/bucket/sham_bk_nfs/info?namespace=degreat_nfs | xmllint --format - | grep '<owner>'
  <owner>sham2</owner>
Cela confirme que le paramètre reset_previous_owners doit être défini sur true. Le propriétaire du bucket rétabli se trouve sur l’interface utilisateur, mais l’API via la CLI confirme qu’ECS voit toujours le propriétaire du bucket comme « sham2 ».
2. Créez un fichier xml simple à l’aide de l’éditeur vi. Dans l’exemple ci-dessous, il s’appelle /tmp/bucket-owner.xml. Il s’agit d’un processus en plusieurs étapes. Nous devons le définir temporairement sur un nouveau propriétaire de sham2. Comme dans l’exemple ci-dessous, avant de revenir au propriétaire d’origine sham1, confirmez la sortie :
admin@node1:~ # vi /tmp/bucket-owner.xml

admin@ecsnode1:~ # cat /tmp/bucket-owner.xml
<object_bucket_update_owner>
   <namespace>degreat_nfs</namespace>
   <new_owner>sham2</new_owner>
   <reset_previous_owners>true</reset_previous_owners>
</object_bucket_update_owner>

3. Change the bucket owner to the temporary owner.
La syntaxe API requise pour remplacer le propriétaire du bucket par « sham2 » via le fichier XML est la suivante :
admin@ecsnode1:~> curl -v -k -X "POST" "https://xx.xx.xx.xx:4443/object/bucket/sham_bk_nfs/owner" -H "$tok" -H "Content-Type: application/xml" -H "ACCEPT:application/xml" -d @/tmp/bucket-owner.xml -v
* Hostname was NOT found in DNS cache
*   Trying xx.xx.xx.xx...
* Connected to xx.xx.xx.xx (xx.xx.xx.xx) port 4443 (#0)
* successfully set certificate verify locations:
*   CAfile: none
  CApath: /etc/ssl/certs/
* SSLv3, TLS unknown, Certificate Status (22):
* SSLv3, TLS handshake, Client hello (1):
* SSLv3, TLS handshake, Server hello (2):
* SSLv3, TLS handshake, Certificate (11):
* SSLv3, TLS handshake, Server key exchange (12):
* SSLv3, TLS handshake, Server finished (14):
* SSLv3, TLS handshake, Client key exchange (16):
* SSLv3, TLS change cipher, Client hello (1):
* SSLv3, TLS handshake, Finished (20):
* SSLv3, TLS change cipher, Client hello (1):
* SSLv3, TLS handshake, Finished (20):
* SSL connection using TLSv1.2 / ECDHE-RSA-AES256-GCM-SHA384
* Server certificate:
*        subject: CN=localhost
*        start date: 2019-03-25 09:53:41 GMT
*        expire date: 2029-03-22 09:53:41 GMT
*        issuer: CN=localhost
*        SSL certificate verify result: self signed certificate (18), continuing anyway.
> POST /object/bucket/sham_bk_nfs/owner HTTP/1.1
> User-Agent: curl/7.37.0
> Host: xx.xx.xx.xx:4443
> X-SDS-AUTH-TOKEN: BAAcUy9KYlhxTlVYb2M0bnF3bTNscEsvSEdDeWhJPQMAjAQASHVybjpzdG9yYWdlb3M6VmlydHVhbERhdGFDZW50ZXJEYXRhOmJhOGQ3ZTkzLTMyMGYtNDNmNy05Y2FkLWM4YWQzMWFiMzY1MAIADTE1NTk3Mzk3OTA2MDgDAC51cm46VG9rZW46YjQ4NGNiZjEtNTkwNy00YWI3LTgzYTctM2Y3OGRhM2RiY2NiAgAC0A8=
> Content-Type: application/xml
> ACCEPT:application/xml
> Content-Length: 179
>
* upload completely sent off: 179 out of 179 bytes
< HTTP/1.1 200 OK
< Date: Thu, 06 Jun 2019 10:56:08 GMT
< Content-Length: 0
< Connection: keep-alive
<
* Connection #0 to host xx.xx.xx.xx left intact
4. Edit the simple.xml file previously created in step 2 and this time insert original owner of sham1
admin@node1:~ # vi /tmp/bucket-owner.xml

admin@ecsnode1:~ # cat /tmp/bucket-owner.xml
<object_bucket_update_owner>
   <namespace>degreat_nfs</namespace>
   <new_owner>sham1</new_owner>
   <reset_previous_owners>true</reset_previous_owners>
</object_bucket_update_owner>

5. Change the bucket owner back to the original owner
The API syntax required to change the bucket owner back to "sham1" through the xml file is as follows:
admin@ecsnode1:~> curl -v -k -X "POST" "https://xx.xx.xx.xx:4443/object/bucket/sham_bk_nfs/owner" -H "$tok" -H "Content-Type: application/xml" -H "ACCEPT:application/xml" -d @/tmp/bucket-owner.xml -v
* Hostname was NOT found in DNS cache
*   Trying xx.xx.xx.xx...
* Connected to xx.xx.xx.xx (xx.xx.xx.xx) port 4443 (#0)
* successfully set certificate verify locations:
*   CAfile: none
  CApath: /etc/ssl/certs/
* SSLv3, TLS unknown, Certificate Status (22):
* SSLv3, TLS handshake, Client hello (1):
* SSLv3, TLS handshake, Server hello (2):
* SSLv3, TLS handshake, Certificate (11):
* SSLv3, TLS handshake, Server key exchange (12):
* SSLv3, TLS handshake, Server finished (14):
* SSLv3, TLS handshake, Client key exchange (16):
* SSLv3, TLS change cipher, Client hello (1):
* SSLv3, TLS handshake, Finished (20):
* SSLv3, TLS change cipher, Client hello (1):
* SSLv3, TLS handshake, Finished (20):
* SSL connection using TLSv1.2 / ECDHE-RSA-AES256-GCM-SHA384
* Server certificate:
*        subject: CN=localhost
*        start date: 2019-03-25 09:53:41 GMT
*        expire date: 2029-03-22 09:53:41 GMT
*        issuer: CN=localhost
*        SSL certificate verify result: self signed certificate (18), continuing anyway.
> POST /object/bucket/sham_bk_nfs/owner HTTP/1.1
> User-Agent: curl/7.37.0
> Host: xx.xx.xx.xx:4443
> X-SDS-AUTH-TOKEN: BAAcUy9KYlhxTlVYb2M0bnF3bTNscEsvSEdDeWhJPQMAjAQASHVybjpzdG9yYWdlb3M6VmlydHVhbERhdGFDZW50ZXJEYXRhOmJhOGQ3ZTkzLTMyMGYtNDNmNy05Y2FkLWM4YWQzMWFiMzY1MAIADTE1NTk3Mzk3OTA2MDgDAC51cm46VG9rZW46YjQ4NGNiZjEtNTkwNy00YWI3LTgzYTctM2Y3OGRhM2RiY2NiAgAC0A8=
> Content-Type: application/xml
> ACCEPT:application/xml
> Content-Length: 179
>
* upload completely sent off: 179 out of 179 bytes
< HTTP/1.1 200 OK
< Date: Thu, 06 Jun 2019 10:56:08 GMT
< Content-Length: 0
< Connection: keep-alive
<
* Connection #0 to host xx.xx.xx.xx left intact


6.  Confirm the bucket owner change is reflected.
Vérifiez que le changement de propriétaire du bucket est désormais « sham1 ».
admin@ecsnode1:~> curl -s -k -X GET -H "$tok" https://XX.XX.XX.XX:4443/object/bucket/sham_bk_nfs/info?namespace=degreat_nfs | xmllint --format - | grep '<owner>'
<owner>sham1</owner>
Une fois que le propriétaire du bucket est rétabli sur l’API, vérifiez que l’hôte peut désormais accéder au bucket sur le système de fichiers Linux.
. 7. Une fois la modification de la configuration effectuée, nous ne devrions plus voir la même erreur
svc_log -f "method updateObjectInternal not allowed" -start "20 hour ago" -sr all -sh -st hour
svc_log v1.0.22 (svc_tools v1.6.8)                 Started 2020-01-23 09:28:17

Running on nodes:              <All nodes>
Time range:                    2020-01-22 13:28:17 - 2020-01-23 09:28:17
Filter string(s):              'method updateObjectInternal not allowed'
Show nodename(s):              True
Search reclaim logs (if any):  False

Count of message occurrences per hour:

2020-01-22 13:xx - 5066
2020-01-22 14:xx - 9580
2020-01-22 15:xx - 9574
2020-01-22 16:xx - 9580
2020-01-22 17:xx - 9570
2020-01-22 18:xx - 9576
2020-01-22 19:xx - 9564
2020-01-22 20:xx - 9576
2020-01-22 21:xx - 9576
2020-01-22 22:xx - 9572
2020-01-22 23:xx - 9564
2020-01-23 00:xx - 9586
2020-01-23 01:xx - 9574
2020-01-23 02:xx - 9572
2020-01-23 03:xx - 4564
2020-01-23 04:xx - 0
2020-01-23 05:xx - 0
2020-01-23 06:xx - 0
2020-01-23 07:xx - 0
2020-01-23 08:xx - 0
2020-01-23 09:xx - 0


Dell EMC is aware of this issue and are working on a fix in a future release.
Informations supplémentaires
Articles connexes de la base de connaissances NFS :
- procédure de création et de montage d'une exportation NFS de base sur un client (en anglais)
- ECS : dataheadsvc log streaming error : NFSv3 procedure LINK not supported in request ReadLinkRequest
- ECS, échec du montage NFS avec l’erreur No such file or directory ou ERROR_OBJECT_NOT_FOUND
- Erreurs d’E/S distante NFS ; la modification du propriétaire du compartiment pour le compartiment activé pour FS peut entraîner l’impossibilité pour les applications/utilisateurs d’accéder aux fichiers NFS (en anglais)
- l'écriture NFS génère une erreur d'E/S après une certaine quantité de données. (en anglais)
- utilisation du partage de fichiers NFS à partir d'ECS avec un datastore VMware NFS (en anglais)
- pratiques d'excellence pour le montage des exportations ECS NFS (en anglais)
- ECS, Comment monter un partage NFS sur un client Windows
- échec du montage NFS après la modification des paramètres d'exportation de fichiers dans l'interface utilisateur (en anglais)
- Oracle WebCenter Content (WCC) est-il compatible avec ECS ? (en anglais)
Abonnez-vous aux mises à jour du produit.
Vous pouvez vous abonner aux mises à jour en suivant les instructions de l’article de la base de connaissances ci-dessous :
DELL EMC : Comment s’abonner aux pages produit - Support Dell ?
Produits concernés
Elastic Cloud StorageProduits
ECS Appliance, ECS Appliance Software with Encryption, ECS Appliance Software without Encryption, Elastic Cloud StoragePropriétés de l’article
Numéro d’article: 000055535
Type d’article: Solution
Dernière modification: 29 Jul 2026
Version: 5
Trouvez des réponses à vos questions auprès d’autres utilisateurs Dell
Services de support
Vérifiez si votre appareil est couvert par les services de support.